I've been so crazy about dream catchers in the last couple of days. Maybe because they're so magical, maybe because they look so peaceful and it's very relaxing to look at them and get kinda "lost" in their webs?
I don't know, I just love them.
But you know what I love even more? Making them.
That's why I'm sharing this tutorial with you, because making your very own dream catcher is such a simple and fun process that you'd want to make more than just one. (So far, I have made 3 large ones and a miniature one for a necklace.)
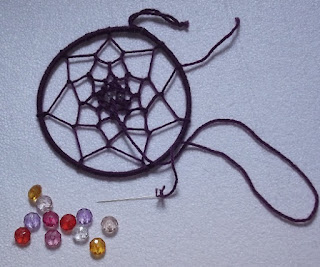
Here's the mini dream catcher.

I used embroidery floss around a tiny curtain ring.
To make a dream catcher you'll need:
• A hoop of some kind (mine was from an old lampshade)
•Scissors
•Yarn/twine/embroidery floss
•A glue gun
•Feathers (But in this tutorial I'll be showing you how to make paper feathers)
•A bobby pin
•Beads
Cover your hoop entirely with yarn. Wrap, wrap, wrap.
Leave a tail and tie it around to form a loop. This is where you'll hang it from.
Then secure the ends with a dab of glue.
Wrap a, well long, length of yarn around a bobby pin, this makes the whole "weaving" thing easier.
Okay, so we're going to use only one stitch and repeat it over and over again to make the web. It's easy I promise.
Start bu tying a knot next to the hanging loop.
Place the yarn over the hoop, then around the back to form a loop, then pull through the loop you just made.
And just repeat this stitch all around the hoop. Try as much as you can to space the stitches evenly.


When you have finished the first row, you'll then attach your loops to the center of each stitch from the previous row instead of the hoop and so on.
2nd row finished! It works up really quickly.
Continue stitching towards the center of the hoop.
Continue stitching towards the center of the hoop.
When you get to the center, it's time to attach a bead to act as the "spider".
Brightly colored glass beads are so cool, no?
Okay so my beads were so big for the center so I ended up adding smaller ones, but I kept them for the dangling strings.
After you attach the bead in the middle of the web, leave a tail long enough to hang down the hoop. This is where you'll glue the feathers.
Tie two other "tails" on each side and add your beads.
Now you're ready to attach feathers. Or in my case, paper feathers like so:
Now just glue the feathers to the 3 tails and you're done!
Here's the finished dream catcher:

I hope you have a great day.
Don't forget to smile. :)


0 Really sweet comments:
Post a Comment
Thank you for taking the time to leave me a little comment.
Roudi