


Good morning fellow crafters. :]
To celebrate back to school,I'll share with you my homemade air-dry clay recipe and a little beginner's tutorial of how to make an apple charm.
An apple necklace would be a sweet gift for teachers or friends on the first day of school,don't you think? ♥
I adore anything miniature,I don't really know but teeny weeny things always seem to make me squeak! ^^
Of course you can skip the recipe and coloring part if you have bought polymer clay already,but I'll start with the ingredients so everyone can make something miniature today! :D
Homemade air-dry clay recipe (Air-dry, no baking required)
A unit (cup,spoon,handful whatever!) flour.
1 unit cornstarch.
1 unit all-purpose white glue (think Elmer's glue! ;)
Baby oil.
Mix all of the ingredients together in a bowl except the baby oil until it forms clay.
First it's going to be reaaally sticky,and you'd probably hate your life and this blog (kidding) XD
But after all the powder goes into the dough,life will be bright again. lol
Now that you have your clay,apply some baby oil to your hands and rub them well. (just a drop or two)
This will help soften your clay and prevent it from sticking on your hands while working. ;)
CONGRATULATIONS! You just made your very own air-dry clay! Do you want to color it? Let's get to it!

Put a piece of clay in your hand and add a drop or two of water colors/acrylic paints.
Now mush it in your hands (boy, how I love messy parts! )
Don't worry if you get paint all over your hands,the clay will absorb it in a flash. ;)
Keep rolling and twisting until the clay has a smooth-one-color effect.

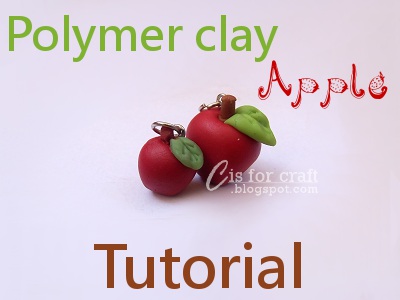
Are you ready to make a cute miniature apple charm? Yeah? Color a ball of red clay just like we did witht he green one,and join me. :]


Roll a little ball of red clay.

Using your thumb and index finger to form indentations at the bottom edges. Do this two times so you have 4 sides. ;)

Using a toothpick, press down from the indentation to the bottom center of the apple to form a "cross" This is just to make it look like a real apple. ;)

We'll make the leaves now. Roll a tiny piece of green clay,then flatten it and shape it like a leaf. Score some veins with a toothpick and you're done.

Press it on the apple, a bit off-center. ;)

To make the brown stem,I cut a tiny piece of a toothpick,and cover it with a tinier piece of brown clay.
Then poke it into the apple,this time right into the center! :D

Now to turn the apple into a charm,I used an eye-pin trimmed to the proper size using pliers and poked right behind the stem. Insert a jump ring and you're done!
There you go, leave it to dry ( time needed depends on thickness) and you have your very own apple necklace. :]

I hope you enjoyed this as much as I did.
Toodles,

I can't wait to try this! This is the first polymer clay recipe that didn't heat the glue on the stove (something that I thought was going to be a bit dangerous with fumes and what not)
ReplyDeleteThank you for the recipe, I will let you know how it turns out for us :-)
Yes, mum would never let me cook glue! EVER!
DeleteI hope this turns out good for you guys. :)
Love,
Roudi
Great job on the tutorial...this is very similar to the clay made with a white bread slice on Cool2Craft.com A bit scary when you add the paint but as you said it will go into the clay. It dries nice and hard so keep your clay airtight in plastic until ready to use.
ReplyDeletequilt 4 fun 2 at hot mail dot com
Thank you very much. Can't wait to see the tutorial on Cool2Craft!
DeleteKisses,
Roudi
This is the answer to my problem!!!... I want to try polymer clay but I'm too cheap to buy it... I need to stock on flour heheh
ReplyDeleteHaha glad you liked that! Can't wait to see what you come up with. ;)
Deletethis is sooo cool! something you don't have to bake and requires routine household ingredients! hope it turns out well!
ReplyDeleteCan't wait to see what you come up with!
Deletedont you have to heat or cook the glue /flour mixture?
ReplyDeleteIs this equal amounts of flour, corn starch and glue? Thanks in advance and thanks for the recipe!
ReplyDeleteWhat happens if i mold something around a metal pipe, i want to do an embelishment for my dad's pipe and I'm not sure if it will melt or something like that?? Thanks!!
ReplyDeletedo we need the cornstarch?
ReplyDeleteThanks for this! I'm looking for a homemade clay to make Bacon & Egg and Peanut Butter & Jelly for earrings!
ReplyDeletethank you very much <3
ReplyDeleteHi I would love to get the same texture I see in the picture. But I didn't. Can you confirm the measurements? I used 1 cup cornstarch 1 cup all purpose flour and 1 cup white glue and it ended up dry and flaky even with baby oil. Would love to try this recipe once again. Let me know
ReplyDeleteyeah!!! Cute trying now!! Will post a pic! Wanting to make weird lil faeries!
ReplyDeleteThank you for the recipe! I live in a country where there is no such thing as a craft store. I plan to try this today :)
ReplyDeleteI used 1 cup of flour ,1 cup of cornstarch and 1 cup of white glue,why do my dough turns sticky and watery ?how to overcome it ?and the flour you mentioned is all purpose flour or plain flour ?
ReplyDeleteSo you put flour and cornstarch in it too?
ReplyDelete